Create an Eddy integration with NetSuite
NetSuite offers powerful integration capabilities to connect with external systems such as Eddy. This guide will walk you through the process of creating a new integration in NetSuite that will allow Eddy to send employee information to NetSuite.
What information is shared?
Eddy will send the following information to NetSuite: Employee Name, Job Title, Department, Manager, Email address, Start date, and Employment status.
Prerequisites
Before you begin, ensure you have Administrator access to your NetSuite account.
Steps to Create a New Integration
1. Access Integration Management
- Log in to your NetSuite account
- Navigate to Setup > Integration > Manage Integrations
- Click on "New" to create a new integration

2. Configure Basic Settings
- Enter a name for your integration. The name is up to you. We recommend something like "Eddy employee sync".
- Select the Token-based integration type

3. Copy Client Credentials
Once you click Save, Copy the Client ID and Client Secret and store them in a safe place. They will only be shown once and you will need to enter it in a future step.

4. Set Up Authentication
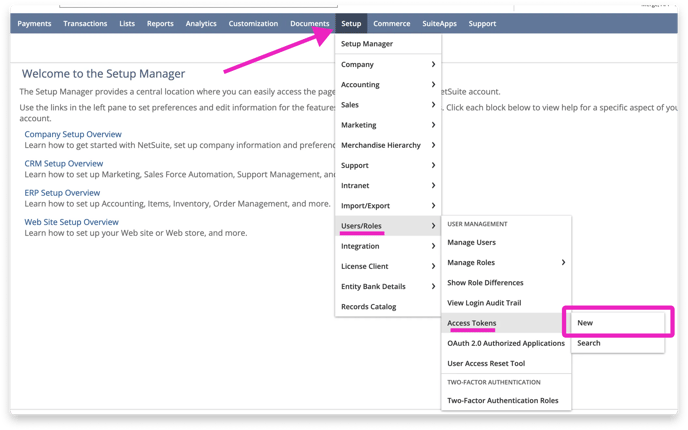
For token-based authentication you'll need to generate an access token. To do this go to Setup and click Users/Roles and then select Access Tokens. Click the option to create a New access token.

4. Define the Access Token
Pick the recently created Integration (you might have named it something like Eddy employee sync) as the Application name.
Select any user, and the role needs to have the following permissions:
- View Subsidiary
- View Department
- Full Employee
For the Token Name you can enter any name you like. We recommend something like "Eddy Employee Sync Token".
Click the Save button when finished.
5. Copy Token ID and Token Secret
When you click Save, NetSuite will generate a Token Id and Token Secret.
Copy the Token ID and Token Secret and store them in a safe place. They will only be shown once and you will need to share this info with Eddy later.

Find your NetSuite Account ID
-
This is the combination of letters or numbers before "app.netsuite.com" of the URL
- If your URL is "https://7600508.app.netsuite.com...", your NetSuite Account ID is 7600508.

Send IDs to Eddy
You'll need to provide this info to Eddy:
- Client ID
- Client Secret
- Token ID
- Token Secret
- Account ID
Send the Client ID, Client Secret, Token ID, Token Secret, and the account ID to Eddy. This information is sensitive and should not be sent via regular email. We recommend secure email or alternatively you can create a PDF with this information and upload it to the Documents area in your Eddy account.
User Set up
These steps will help you make sure the necessary permissions are in place. To assign the required permissions to a user’s role:
- Go to Setup > Users/Roles > User Management > Manage Roles.
- Locate the role you want to modify. Click the corresponding Edit or Customize link.
- On the Permissions subtab, click Setup.
- In the Permission list, select REST Web Services.
- In the Level list, select Full.
- Click Add.
- On the Permissions subtab, click Setup.
- In the Permission list, select Log in using Access Tokens.
- In the Level list, select Full.
- Click Add.
- On the Permissions subtab, click Reports.
- In the Permission list, select SuiteAnalytics Workbook.
- In the Level list, select Edit.
- Click Add.
- Click Save.
