An Eddy integration with Employee Navigator is a huge time saver for people running payroll in Eddy and doing benefit administration in Employee Navigator. Because both systems require some of the same employee information, a data sync integration means you can avoid the time and tedious work required to manually enter info into both systems each time any employee information is changed.
Data is automatically updated in both systems:
- Any changes to employee information made in Eddy are automatically sent to Employee Navigator.
- Any changes to employee deductions made in Employee Navigator are automatically sent to Eddy.
Before You Begin
Plan for the timeline. The setup process typically takes a few days to a few weeks and includes 1–3 phone calls. Don't wait until the last minute — Employee Navigator recommends completing the integration at least 30 days before your Open Enrollment Renewal Date.
Know who needs to be involved. Setup usually requires four people: your Employee Navigator specialist, your broker, you, and an Eddy team member. If your broker has experience with this integration, fewer people may be needed.
Make sure you have admin permissions in both systems. You'll need appropriate admin access in both Eddy and Employee Navigator to complete setup. Some steps happen in Employee Navigator, and some happen in Eddy.
Complete these items in Employee Navigator before your kickoff call:
- Watch the Employee Navigator integration intro video
- Ensure payroll group(s) and pay calendars are set up in Employee Navigator to match payroll
- Ensure your benefit classes are set up in Employee Navigator
Add Eddy as a Payroll Service in Employee Navigator
The first step is to add Eddy as a payroll partner in your Employee Navigator account. To begin the integration process, open Employee Navigator and go to the Payroll tab.
Note: This step must be done by a person who has HR user permissions in Employee Navigator.
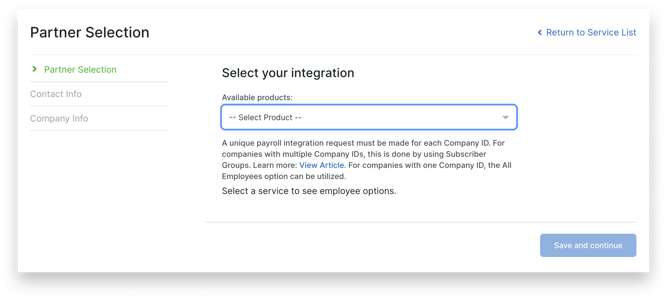
Within the Payroll tab in Employee Navigator you'll see a link on the left rail for Partner Selection. Click to open Partner Selection, then click the Add a Service button to add Eddy as a payroll service.
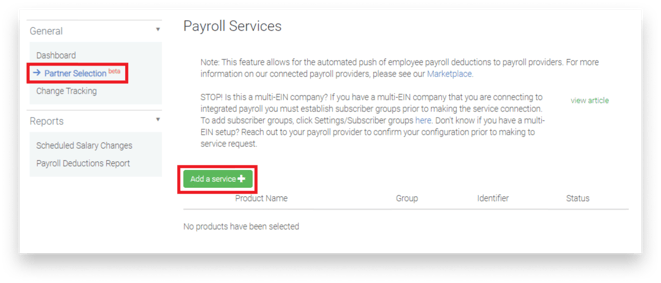
When you click the Add a Service button, you'll be able to select Eddy from a list of all payroll integration partners available in Employee Navigator.
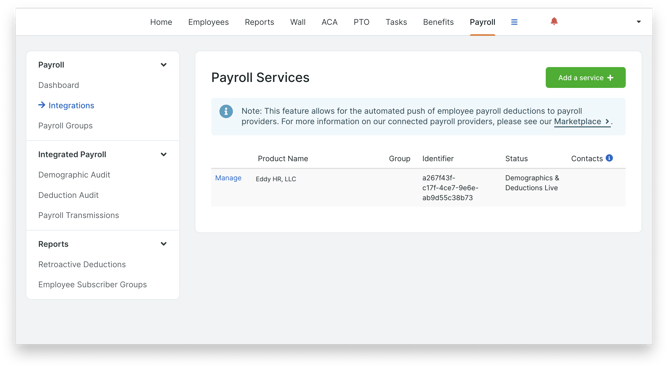
Once you've added Eddy as a payroll service, you will see Eddy listed in Employee Navigator.
After this step is completed, within a short period (usually same-day) you will receive an email from Eddy to kick off the integration process with Employee Navigator.

Once you receive this email you will also receive an email from the team at Employee Navigator. This email includes important instructions and a calendar link. Using this calendar link to schedule your kickoff call is an essential first step, so don't delay doing this.

Integration Steps
The integration requires 2 main steps. The goal of the first step is to activate the integration and map your benefit plans in Eddy to matching plans in Employee Navigator. This mapping ensures that each employee deduction is correctly identified as the appropriate deduction (medical, vision, dental, HSA, AD&D, etc.), and deduction codes are pushed to Employee Navigator automatically.
Once both steps are complete, changes to employee deductions made in Employee Navigator will flow into Eddy Payroll automatically.
Step 1: Activate the Integration in Eddy
Once you've received the kickoff email from Eddy, navigate to Admin Settings → Integrations and find the Employee Navigator card. Click the Setup button on the card.

A dialog will appear explaining that there is a cost to use the Employee Navigator integration. The fee is $1.00 per person per month. By clicking Activate Employee Navigator Integration, you acknowledge that this fee will be added to your monthly invoice. Click No thanks to cancel.
After activating, you'll see a confirmation that Employee Navigator has been added to your subscription. Click Continue to proceed to plan selection.
Step 2: Select and Map Your Benefit Plans
You'll be taken to the plan selection page, which lists all your existing Eddy benefit policies. Select all the policies that correspond to your plans in Employee Navigator.
Note: Your selected Eddy benefit policies will be converted to Employee Navigator managed policies. Managed policies will no longer be editable in Eddy — any changes will only have to be done in Employee Navigator and will be automatically synced to Eddy.
After selecting your plans, click Send policy info to Employee Navigator. Eddy will map the plans, generate deduction codes, and push them to Employee Navigator automatically.

You'll then see a page showing each mapped plan alongside its assigned deduction code. Review this list to confirm everything looks correct, then click Finished.

Once at least one plan has been successfully mapped, the Employee Navigator card on the Integrations page will show a Connected status. You can click Manage at any time to return to the deduction codes page.
A note about Managed Benefit Policies
Deductions managed by Employee Navigator have unique characteristics in Eddy:
- Each deduction has a deduction code assigned. This code cannot be edited or changed.
- Employees can only be assigned to the benefit policy from within Employee Navigator. There is no option in Eddy to add employees directly.
When adding a new benefit policy after the integration is live, Eddy will ask whether each new policy is managed manually or managed using Employee Navigator.
Complete Remaining Steps in Employee Navigator
Once you've finished setup in Eddy, there are additional steps that must be completed in Employee Navigator before the integration is fully live. The Employee Navigator help articles below walk through each of these steps:
- How to Map and Edit Your Deduction Codes
- Completing Your Demographic Audit
- Completing Your Deduction Audit
Your Employee Navigator analyst will guide you through these steps during your kickoff call.
Integrated Fields
The following fields are integrated between Eddy and Employee Navigator. Once the integration is complete this info will be kept in sync between the two systems.
| Field Name | Direction of Exchange |
|---|---|
| Address 1 | Two-way |
| Address 2 | Two-way |
| City | Two-way |
| State | Two-way |
| ZIP | Two-way |
| Phone | Two-way |
| Annual Base Salary | Eddy to EN Only |
| DOB | Two-way |
| First Name | Two-way |
| Sex | Eddy to EN Only |
| Hire Date | Eddy to EN Only |
| Job Title | Eddy to EN Only |
| Compensation Basis | Eddy to EN Only |
| Last Name | Two-way |
| Middle Name | Two-way |
| Hourly Rate | Eddy to EN Only |
| Payroll ID | Eddy to EN Only |
| SSN | Eddy to EN Only |
| Termination Date | Eddy to EN Only |
| Pay Effective Date | Eddy to EN Only |
| Work Email | Two-way |
| Personal Email | Two-way |
Open Enrollment
The integration does not change how Open Enrollment works. Employees continue to make benefit elections in Employee Navigator, and those election choices and amounts are automatically sent to Eddy.
Existing plans keep their current mapping — no action is needed at Open Enrollment for plans that are already connected.
New plans must be added in both Eddy and Employee Navigator. Once the plan has been added in both systems, refresh the deduction codes in Employee Navigator so the new code is available, then map the new plan. To refresh codes, go to the Payroll tab in Employee Navigator and click View Codes in the Deduction Codes box on the Integration Overview page. On the Deduction Code Settings page, click the Vendor Payroll Codes button, then click the green Refresh Codes button in the dialog. Once the codes are refreshed, map the new plan to complete the connection.
Cost Center Mapping
Employee Navigator can map cost centers to fields in Eddy, giving you more granular control over how employee data is organized across both systems. The following Eddy fields can be mapped to a cost center in Employee Navigator:
- Department
- Location
- Division
- Worker Classification
- Employment Type
Cost center mapping is configured in Employee Navigator and can be done without assistance from an Employee Navigator analyst. To set up or edit mappings, go to the Payroll tab in Employee Navigator and navigate to Cost Center Mappings.
Note: Changes made to any of these fields in Eddy are not automatically reflected in Employee Navigator. If you update Department, Location, Division, Worker Classification, or Employment Type for an employee in Eddy, you will need to manually refresh the cost center mapping in Employee Navigator to keep the data in sync.
Frequently Asked Questions
Does the integration change how Open Enrollment works? No. Employees continue to make benefit elections in Employee Navigator. The integration ensures those election choices and amounts are automatically sent to Eddy.
What happens to my existing benefit policies in Eddy once I map them? Policies you map to Employee Navigator will be converted to Employee Navigator managed policies. They will no longer be editable in Eddy — all changes must be made in Employee Navigator and will sync to Eddy automatically.
Can I add employees to a managed benefit policy in Eddy? No. Once a policy is managed by Employee Navigator, employees can only be assigned to it from within Employee Navigator.
What if I don't see a policy I want to map? On the deduction codes page, click See non-managed policies to view policies that weren't included in the mapping.
How long does setup take? The process typically takes a few days to a few weeks depending on your organization's readiness and scheduling. Plan to complete setup at least 30 days before your Open Enrollment Renewal Date.
Is there a cost for the integration? Yes. The Employee Navigator integration costs $1.00 per person per month, billed through your Eddy subscription.