Keeping track of Time Off policies and managing employee time off can be difficult, confusing, and time consuming. Eddy simplifies this process by allowing you to create custom policies that accrue how and when you need. Eddy also allows you to create stipulations to every policy, such as setting a max balance, carry over limit, and more!
Availability: Starter and Growth* plans.
Access: Any Owner or HR admin has the ability to create a time off policy.
Creating a Time Off Policy Overview
Where do I Create a Policy?
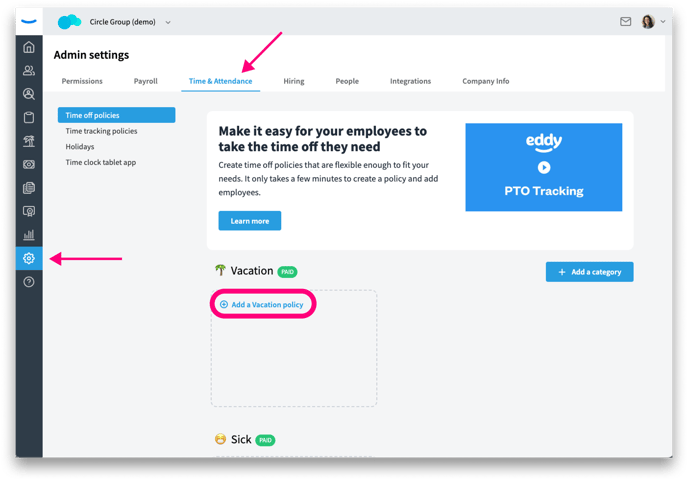
To set up a policy, go to the Admin settings followed by the Time & Attendance tab. The default sub-tab is Time off policies. From there, you can create policies as needed.
 What Kind of Policies Can I Create?
Within Eddy, you can clearly define your Time Off policies for your employees. The default categories are Vacation, Sick, and Holiday. You can create up to 1 time off policy in each available category with our Starter plan.
Availability: *Custom categories, including unpaid categories, as well as additional policies for each category are available with the Growth plan.
How To Create a Policy
Creating a policy is simple and straightforward. You can start by clicking on the Add a policy card that is located under the specified category. The Time Off policy form that pops up is dynamic; the options you select determine if additional fields will expand and become available.
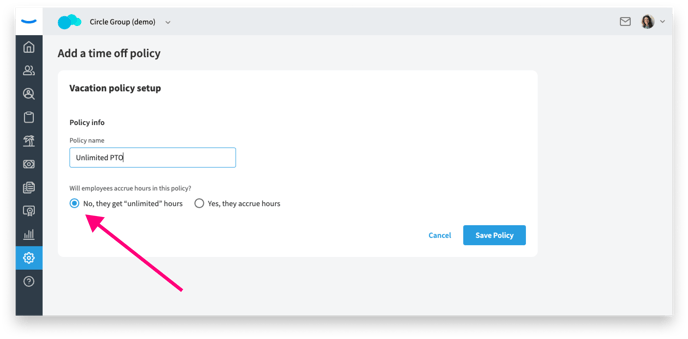
The first item on the form is giving your policy a name. We recommend creating a clear, easy to understand policy name that you won’t be afraid to share since it, along with the Category name, will be visible to all employees added to the policy.
After naming the policy, the first dynamic option is whether or not the policy has a limited or unlimited accrual method. In the sections below, we’ll explain both types of policies so you can decide which is best for your company.
Creating an “Unlimited” Time Off Policy
If you choose unlimited accrual, employees will not carry a time off balance. They will be able to request time off without the constraints of making those requests against an existing balance.
The “Unlimited” accrual option is the most strait forward policy creation since no additional stipulations need to be added to an unlimited policy. Once you’ve selected unlimited accrual, hit the “Save Policy” button at the bottom of the page.
Creating a “Limited Accrual” Time Off policy
If you decide to put a limit on the amount of time your employees can accrue, there are a few extra steps in order to accurately set up the policy to function as your internal company policy intends. Once you’ve created a name for your policy and determined it will be a limited accrual policy by selecting the option Yes, they accrue hours, you’ll notice some additional fields drop into the form when creating the policy.
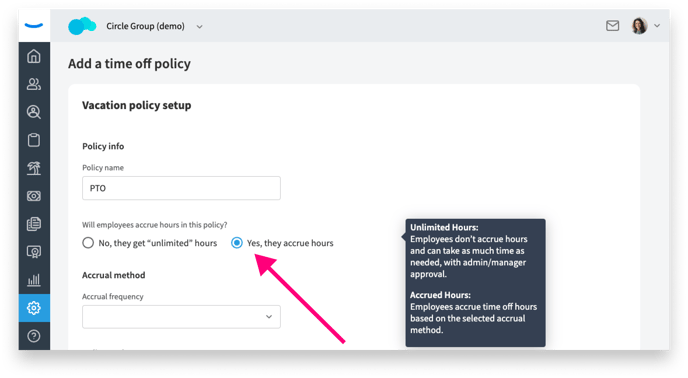
These fields will help set rules around how much, as well as how often an employee accrues time off. These fields will also help you to define limits such as a carry over balance, max balance, and even building in employment milestones. The set up of these additional fields is crucial for the policy to function as intended.
Note: You can find additional info for each section by hovering your mouse over the section heading of this dynamic form.
Accrual Method
Eddy offers multiple accrual method frequency options to accommodate all kinds of businesses and policies. Options include accruing time off based on hours worked (which is determined by a time tracking policy), as well as accruing time off based on the passage of time (i.e. employees accrue 2 hours of Paid Time Off every other week). Additionally, Eddy accommodates "lump sum" accruals where the Time Off hours are given at the beginning of the cycle period. For example, if you want to give your employees 80 hours of time off for the year when the policy renews on January 1st, you can do so.
Select your accrual frequency from the dropdown menu. Then input the base amount in hours employees will accrue in the selected frequency, and when those hours will accrue. Weekly and Every other week frequencies have a day of the week selection, where as Twice a month; Monthly; and Yearly frequencies have a date selection to choose from when determining when employees will accrue the amount listed.

Policy Cycle
When defining the parameters of an accrual time off policy, you'll need to decide when the annual policy cycle will start and subsequently renew each year. Most companies choose to start their cycle on January 1st, but we understand that you may need the flexibility to start their policy cycle on a different date, depending the industry and fiscal calendar.
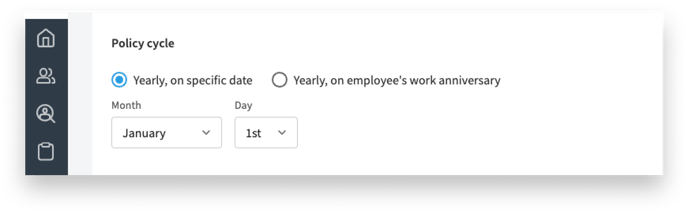
Note: For annual policies, the policy cycle date will also be the accrual date so employees have the full year to use the allotted time off.
Max Accrual
This dynamic field is only available with the Per hours worked accrual frequency. Since overtime hours are not omitted when calculating how much time off accrues under a per hours worked policy, a Max Accrual limit caps the total amount of hours an employee can earn in a policy cycle year.
Once the Max Accrual amount is reached on an employee's policy, no more hours will accrue until after the policy cycle date resets the policy. This remains true regardless of how much time off the employee has used during the year, or what their current balance on the policy is when the max accrual is reached.
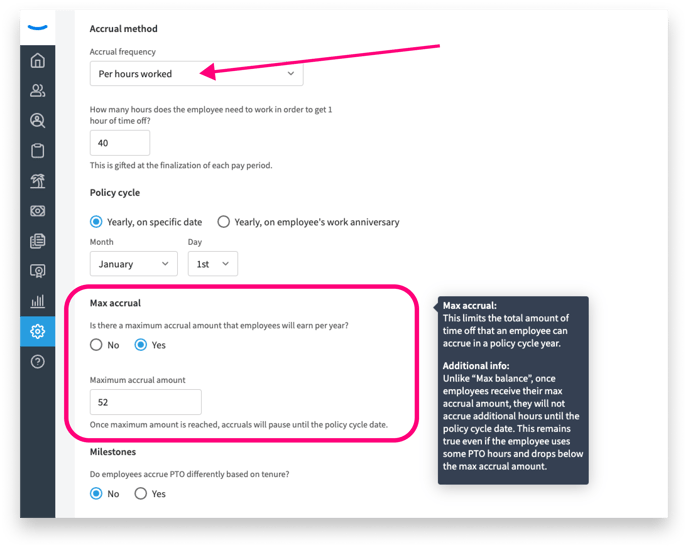
For example, if a company policy stipulates an employee will earn 1 hour of time off for every 40 hrs worked, which is a typical work week, then they should accrue 52 hours in a policy year. However, if the employee works a lot of overtime during a busy season they could earn a lot more. So the company may want to include a max accrual amount of 52 hours so an employee cannot earn more time off than what the company policy allows.
Note: Any hours given when an employee is added to the policy, or as an admin adjustment, does not currently count towards the max accrual amount.
Employment Milestones
Employment Milestones are a way to reward employees who have worked for longer periods of time at the company.
Milestones are optional and you do not need to include them in your policy. However, if you do choose to allow employees to accrue time at a faster rate when they hit employment milestones, Eddy makes this easy by building it into a single policy instead of setting up a different policy for each milestone that an admin will have to manually monitor and move employees as needed.
Start by selecting an employment milestone from the dropdown. Choose the work anniversary that triggers when an employee will start to accrue time at a faster rate then the base rate accrual that is listed above. Next, input the new accrual amount into the Hours earned field for employees who reach that particular milestone. The hours earned listed for each milestone is the total number of hours the employee will receive on that work anniversary, not an additional amount to the base hours accrued for the policy.
Employees will continue to accrue hours at the last milestone rate until the next milestone is reached. This means you do not need to list a milestone for every year if your company policy increases the amount of time off earned in longer increments such as 2 or 5 years.
Only 1 Max Accrual amount can be set for each policy. This means, with milestones on a Per Hours Worked policy, you will want to make sure the max accrual does not cancel out any milestones that are set up.

Note: If the policy cycle date is a specific date and not on the employee's work anniversary, then the milestone hours will go into affect on the next policy cycle date after the milestone is reached.
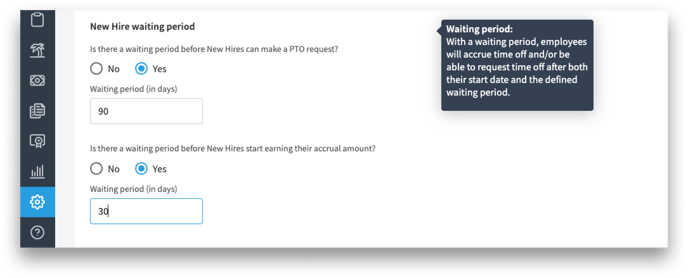
Waiting Period for New Hires
A waiting period is often used by companies to evaluate new hires in their role before offering benefits. To assist in automating this internal policy, Eddy has 2 different waiting period options you can enable:
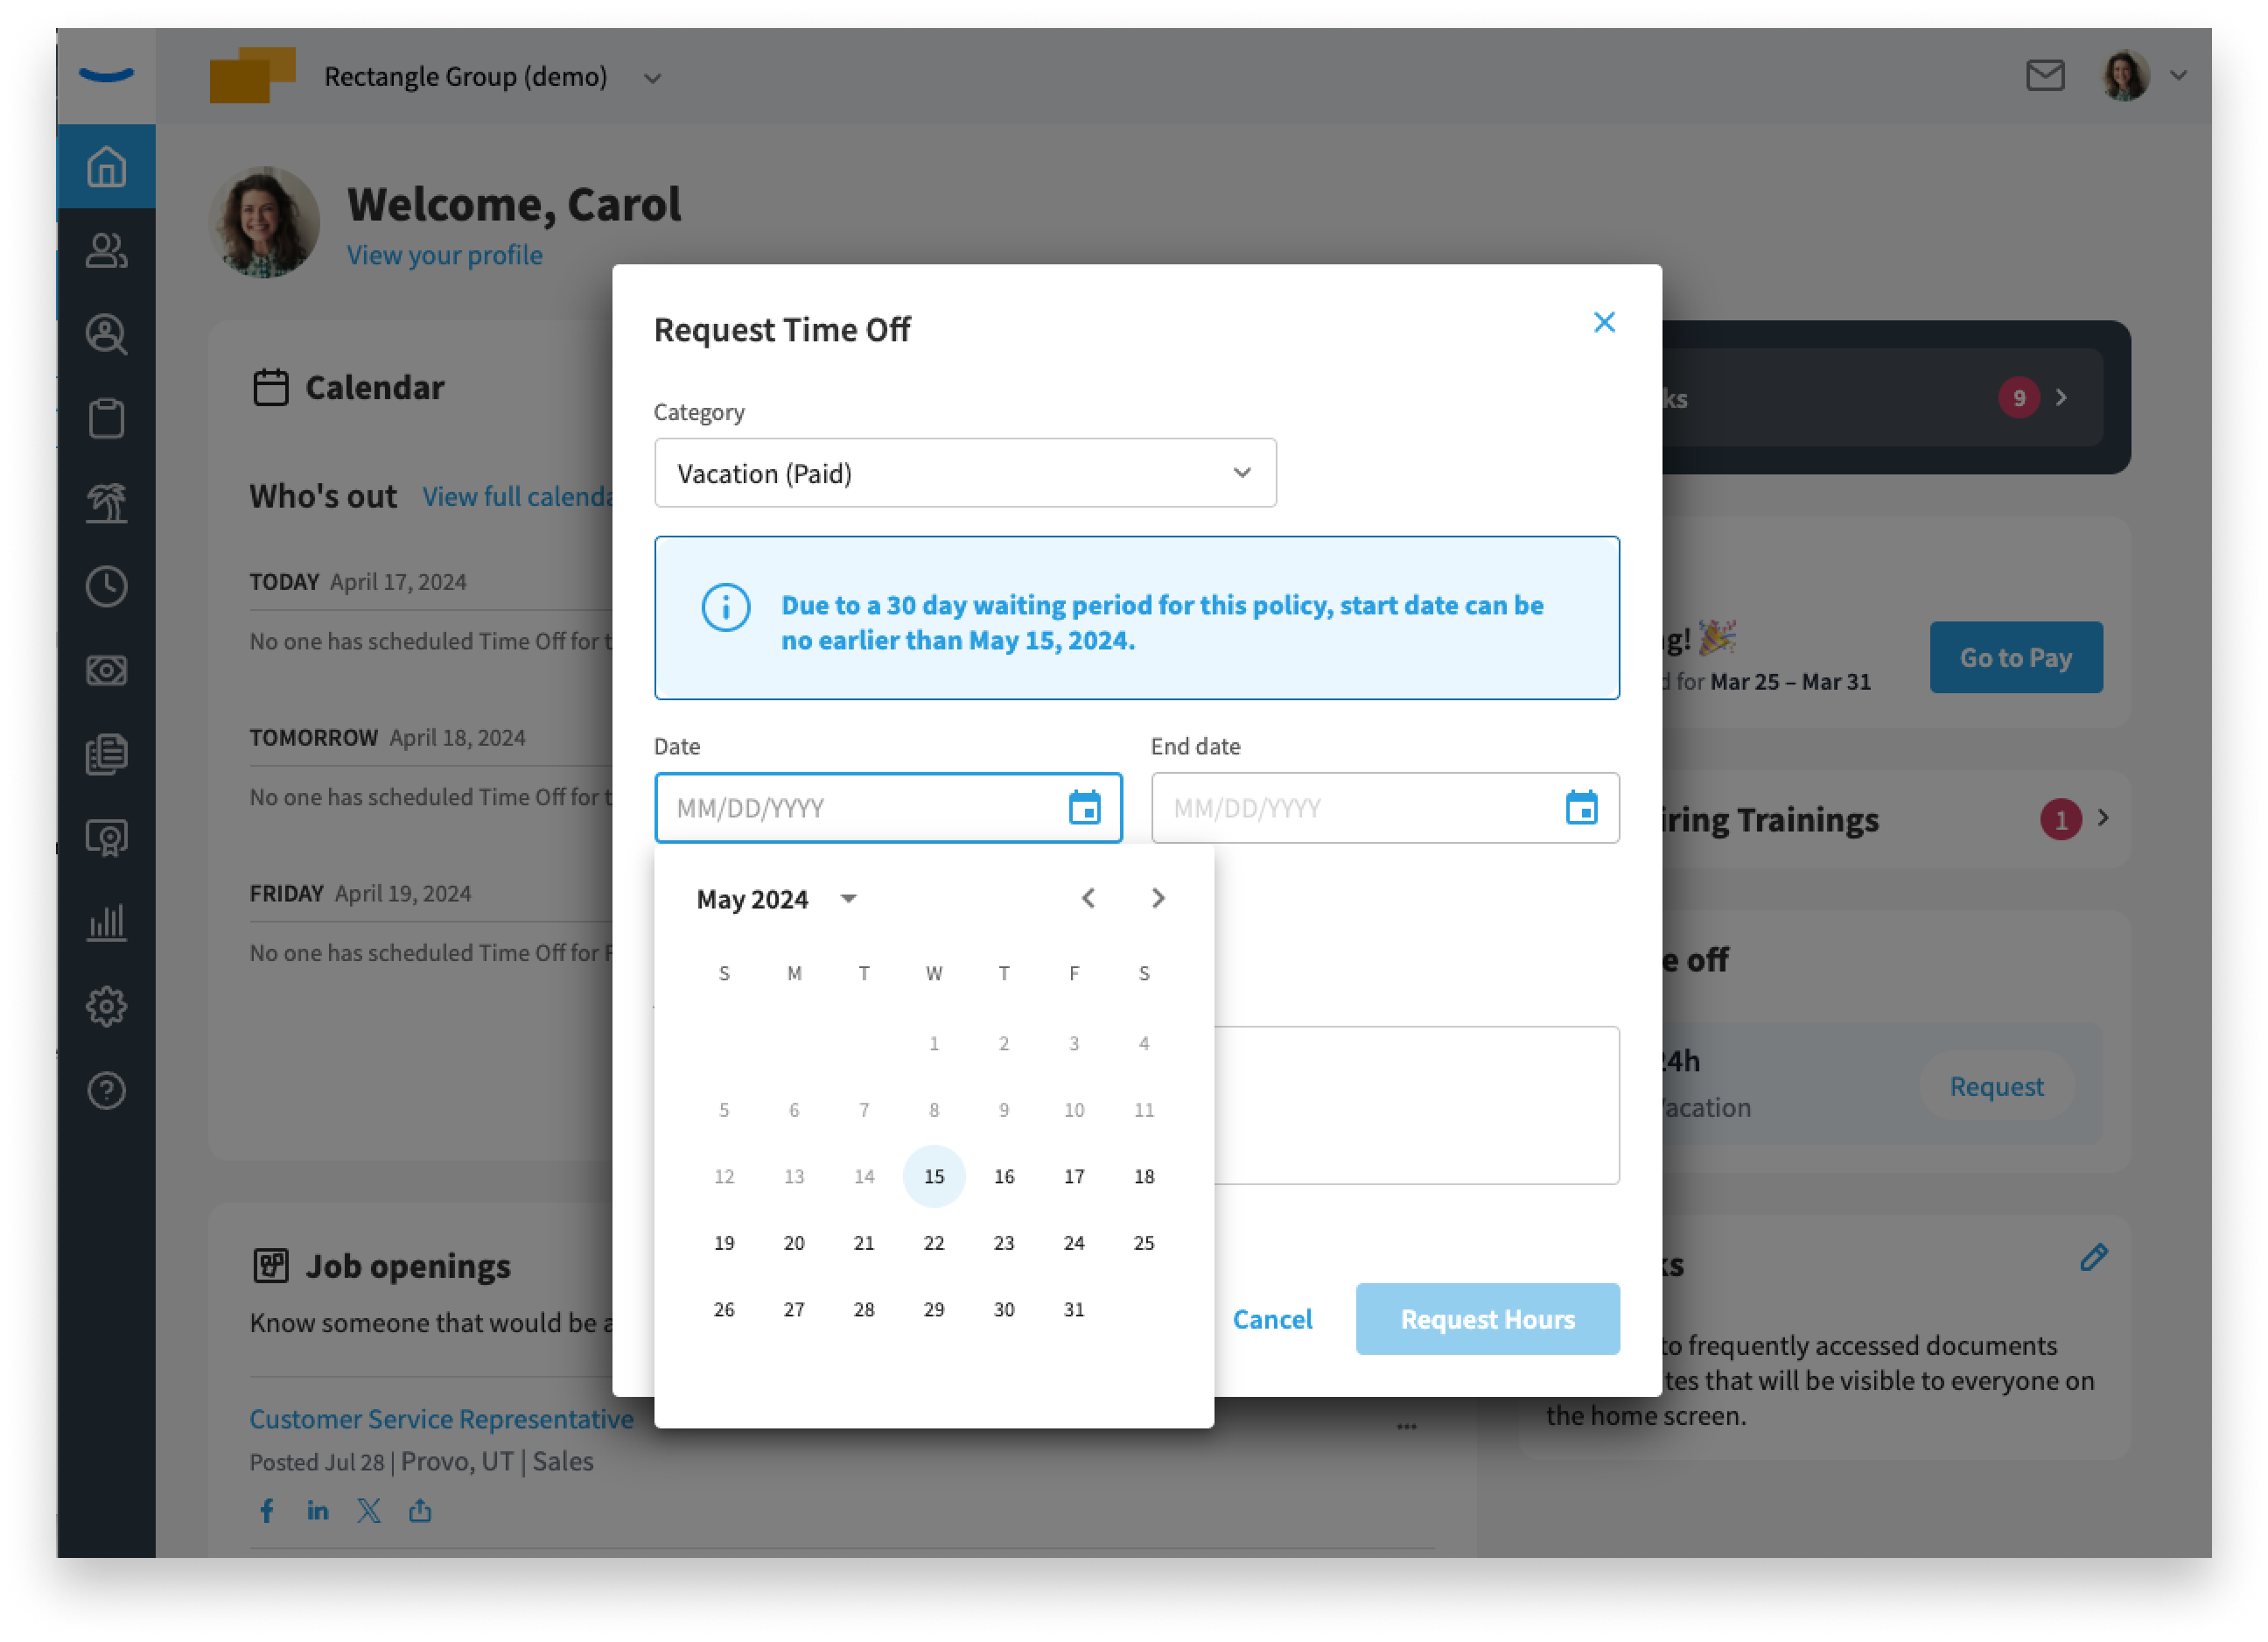
1. Waiting period to request time off: When enabled, employees are not allowed to submit a time off request to be used during the waiting period. However, they are able to submit a time off request at any time for a date after the waiting period has ended. For example, if the policy has a 30 day waiting period to request time off, the employee will see a greyed out calendar for those 30 days. But, on the employee's 5th day of work they can submit a time off request for their 31st day. This is so they are able to give ample notice to management of time off requests that will be taken after the necessary waiting period.
2. Waiting period for accruing time off: When enabled, it will ensure that the employee does not accrue any time off within Eddy for the allotted period. For example, if the policy accrues weekly but the company does not want time off to accrue the first 30 days while the employee is in training, a 30 day accrual waiting period will prevent time off from accruing until the week after 31 days has elapsed from the employee's date of hire. This option is only effective on policies that accrue at a frequency less than Yearly.
Note: Waiting periods are calculated in total calendar days, not business or working days.
If you’d like to implement a waiting period, click the “Yes” option and a new field will drop into the form where you’ll input the number of days you’d like a new hire to wait before they they can request and/or begin to accrue Time Off.
 Carry Over Limit
Throughout the year, and over the course of many years, employees may build up a large balance of paid time off by choosing not to use the hours they have earned. If you choose not to implement a carry over limit, the entirety of an employee’s time off balance will be carried over from one year to the next.
You may choose to specify a carry over limit in order to encourage employees to use the time off they’ve accrued. This will incentivize employees to take paid leave throughout the year rather than saving it and carrying it over to the next year.
To do this, click the “Yes” option and then type a number into the “Max carry over amount” field.
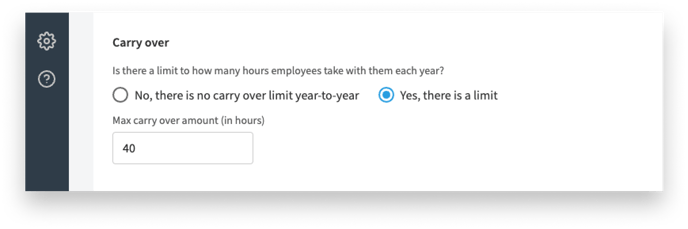
Note: If your company policy does not allow employees to roll over any hours from one year to the next, this IS considered a Carry over limit of 0 hours.
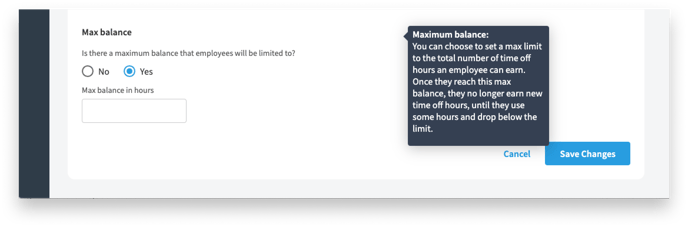
Max Balance
A max balance is a ceiling on the amount of hours an employee is able to accrue at a time. This feature is most effective for policies that accrue more frequently than an annual basis. A max balance should be high enough that it does not significantly infringe on an employee’s ability to take a well deserved vacation.
When an employee reaches the max balance you’ve defined, the employee will stop accruing paid time off until their balance drops below the defined maximum. The number you enter into the max balance field must be greater than the max carry over limit, otherwise the max balance will override the carry over limit which will prevent employees from receiving the full hours earned.
 Saving the Policy
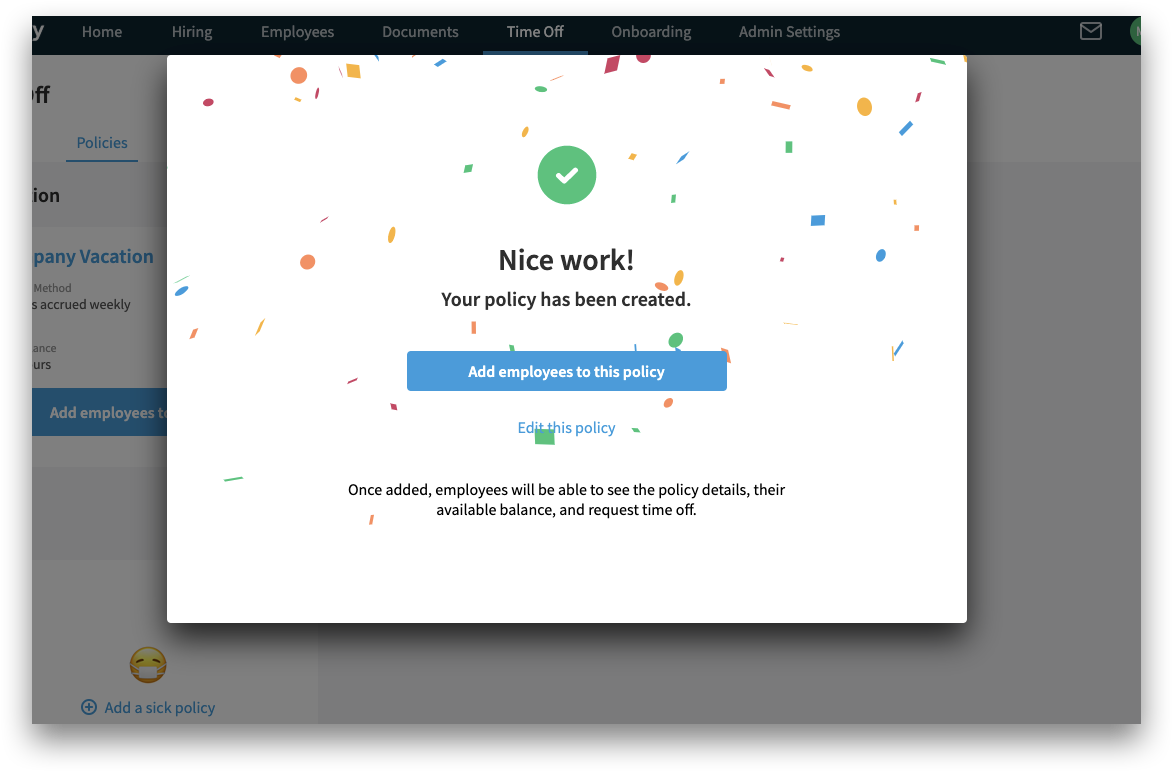
Once you have completed your policy creation form all you need to do is click Save Policy at the bottom of the screen.
Congratulations, you’ve now got a Time Off policy created in Eddy!
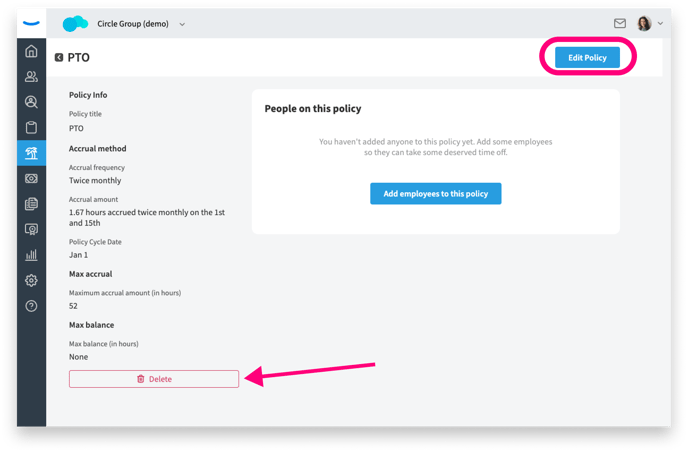
Editing a Policy after it is created
Once a time off policy is created, you can make changes until employees are added to it. If your company decides to update or change a time off policy, all employees will be automatically removed from the current policy and their balance set to 0 when the active policy is deleted. Therefore, before deleting a policy, it is recommended to download the Time off Balances report if you intend to roll over the current balance to the new policy.
Availability: *With the Growth plan, a second time off policy can be created in a category and employees can easily be moved from one policy to another, with the option to carry over the existing balance, before the original policy is deleted.