Before You Start
Before you set up Shift Scheduling, make sure you have a few key details ready so setup goes smoothly:
-
A list of locations where employees work. See how to add a company location
-
A list of positions/roles you schedule (for example: Server, Front Desk, Technician).
-
Your time clock policies and which workers belong to each policy. See how to set up a time clock policy
-
Your break rules (meal and rest breaks, whether they are paid or unpaid, and when they usually happen). See how to set up break rules
Having this information prepared helps you create a clean, consistent schedule from day one and reduces the chances you’ll have to stop mid-setup to fix data elsewhere.
Set Up Your Schedule in Admin Settings
The first step is to define your schedule and add workers to it. This connects scheduling to your existing time and attendance setup.
Permissions: You must have HR Admin permission in order to set up shift scheduling.
-
Go to Admin Settings > Time & Attendance > Shift Schedules.
-
Find the location where you want to enable scheduling.
-
Click the link to Enable shift schedule
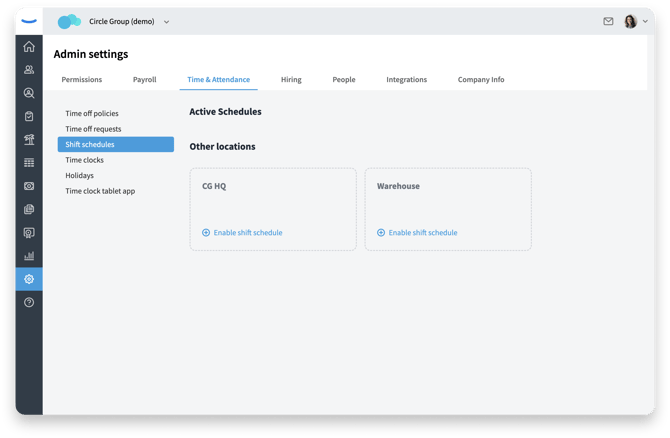
Enable a schedule for each location.
Set up Schedule details
Shift Scheduling is enabled location by location, which lets you roll it out gradually or only where it’s needed. The first step in setting up the scheudle is to define the basic rules for how this location’s schedule should behave.
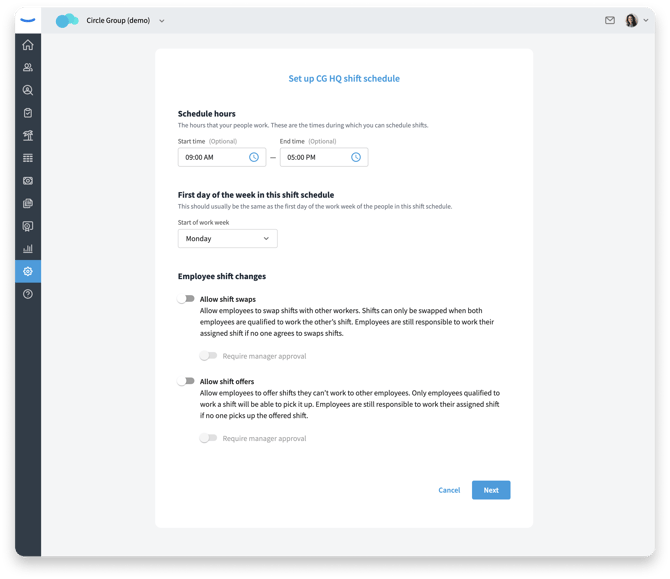
After enabling shift scheduling for a location, You’ll see options to set the schedule hours, week start, and employee shift change rules.
The Schedule hours define the general window when you expect work to happen for this schedule. These times are optional but can help narrow the time range you see most often when building shifts.
-
In the Schedule hours section, set a Start time (for example, 09:00 AM).
-
Set an End time (for example, 05:00 PM).
-
Leave either field blank if your schedule doesn’t have a consistent start or end time. These times limit when you can schedule shifts, but they give you a helpful default window for this location’s schedule.
Next, choose the First day of the week in this shift schedule. This controls how the schedule is grouped and displayed.
-
In the First day of the week section, open the Start of work week dropdown.
-
Select the day that matches your organization’s workweek (for example, Monday or Sunday). This setting helps your schedule line up with how you track time.
You can also decide whether employees can request to trade shifts with each other.
-
In the Employee shift changes section, toggle Allow shift swaps on if you want employees to be able to swap shifts.
-
Review the description: shifts can only be swapped when both employees are qualified to work the other person’s shift, and employees are still responsible for their assigned shift if no one agrees to swap.
-
(Optional) Turn on Require manager approval if you want a manager to approve each swap request before it is final.
Enabling shift swaps gives employees more flexibility while still keeping you in control of coverage.
Assign Workers via Time Clock Policies
Because scheduling ties directly into time tracking, workers must belong to a time clock policy before you can add them to a schedule.
After you click Next you'll see a list of workers in the selected location who can be included in shift scheduling. Important: Workers must be part of a time clock policy in order to be added to a schedule. If a worker doesn’t appear in the list, check that they are assigned to the correct time clock policy first.
This step establishes which workers belong on each schedule, so the right people show up when managers start assigning shifts.
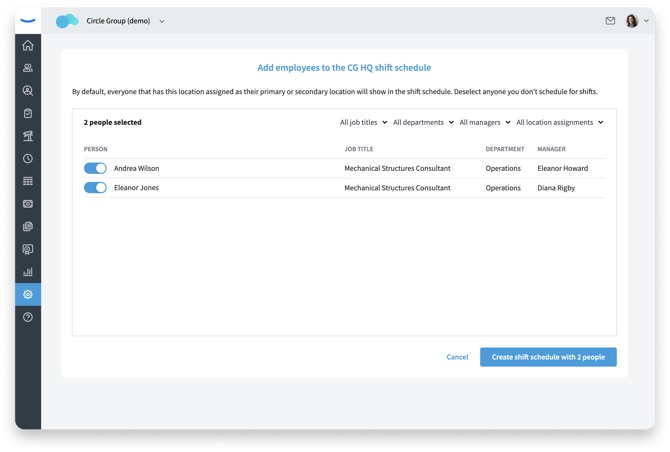
Assign workers to a time clock policy so they can be added to a location’s schedule.
Access the Scheduler from Global Navigation
Once the location is enabled and workers are added to its schedule, you’re ready to use the scheduler.
-
From the main menu, click the new Scheduling tab in the global navigation.
-
Use the location selector (if available) to choose the location you just configured.
-
Confirm that the workers you added appear in the schedule grid for that location.
If you don’t see the location or some workers are missing, go back to Shift Schedules in Admin Settings to confirm the schedule is enabled and the workers are added.
Next Steps
With setup complete, you’re ready to build schedules your team can use.
We recommend reading these next:
-
Creating and Publishing Shifts – Learn how to add shifts, include breaks, and publish a schedule.
-
Managing Recurring Schedules and Templates – Save time by reusing schedule patterns.
-
Handling Shift Changes, Swaps, and Open Shifts – Keep your schedule accurate as things change.
- Who can manage schedules
These guides will walk you through day‑to‑day scheduling so you can keep every shift covered and your team informed.